Overview of Arcadier’s APIs
This guide covers
- The basics about Arcadier’s APIs
- How to use Postman to test out Arcadier’s list of APIs
- How to incorporate and utilize Arcadier’s APIs into your code functions
By downloading this file, you agree that its use is subject to the applicable Terms of Service and You can only use and modify the content in these exercise files with the following agreements: That these files are for Your own personal use for education purposes and to practice the skills to develop on Arcadier. That by using or altering these samples codes, You understand that Arcadier is not responsible for any effects these codes may have on your application, software or environment, both positive or otherwise.
Guide Article
This guide will walk you through the basics of Arcadier’s APIs and give you a step-by-step guide on how to access, call, and implement them into your Marketplace. There is significant versatility and flexibility in the application of Arcadier’s APIs so the possibilities will depend on the imagination of the developer using the APIs. Interested to find out more about the types of APIs Arcadier has? View Arcadier’s entire list of available APIs here and to learn more about how to implement them into your codes..
Let’s begin:
- To get started, download the free Postman app. This will be the app we will use to test and to call the APIs. To obtain this app, go to https://www.getpostman.com/downloads/
- Once you have downloaded Postman, click the “Run in Postman” button to open up the APIs. You will then be prompted to choose your operating system
- The list of Arcadier’s APIs will be automatically added on the left hand side of Postman
How to call and incorporate Arcadier’s APIs into your codes using Postman
The first practice test API call we will do is the Non-Authorized Get Category API.
- For this particular API, it does not require any authorization so any User will be able to call this API
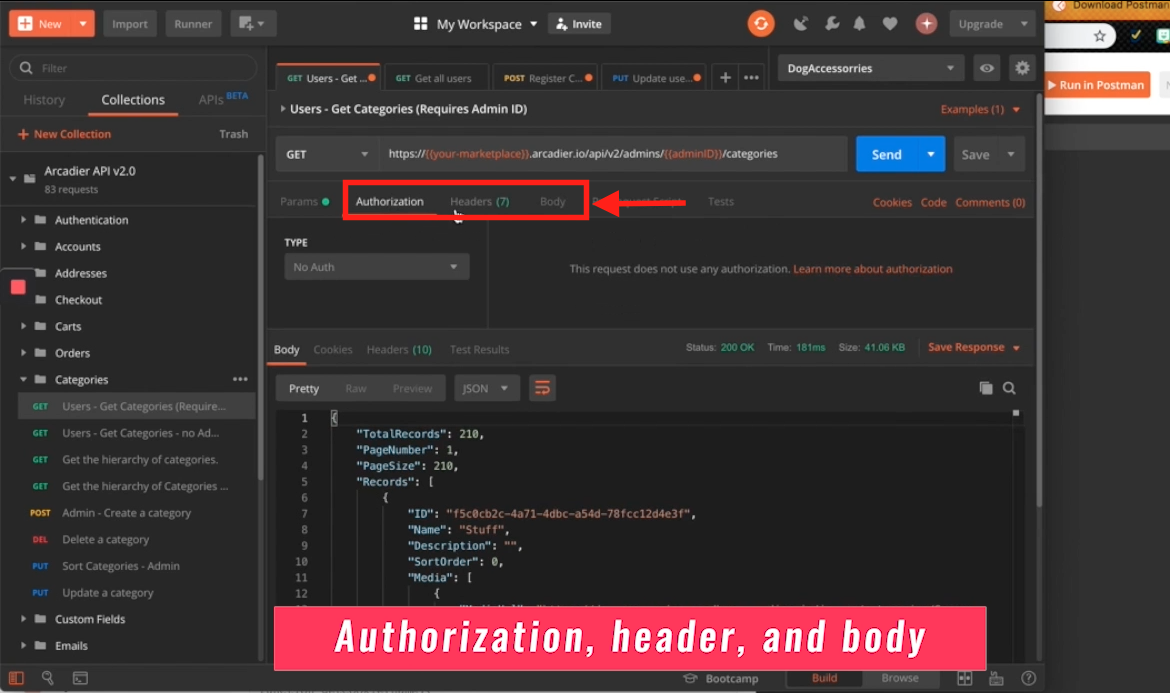
- Simply look for the Authorization, Header, and Body tabs on the left-hand side of your Postman app. These tabs will be empty as no extra parameters will be required.

- The necessary parameters required are your AdminID and Marketplace details. You can find these details in the picture above
- In order to initialize these variables, you will need to first create an environment. For your Marketplace name, type in the part of the url that comes after “http” but before arcadier.io. As an example, we will use is “https://dogaccessories.sandbox.arcadier.io”
- In your Admin dashboard, right-click anywhere on your dashboard and select Inspect. Find the variable called userGuid and look for the associated value next to it. This associated value is your adminID
- Highlight your adminID, and copy and paste this value in the adminID under the variable field on Postman. Once you have done that, click Send. Your new API is now ready!
How do you call the Non-Authorized Get Category API?
To call this specific API to code, you will need to open up a basic css, html, and javascript file on Postman to showcase these examples. This task will be similar to the Hello World plug-in example in the first How-To Guide. The only difference this time is that the button will be set to console log the response of the API call (instead of changing the background color of the Hello World text).
- Go to Arcadier’s API page , find the corresponding Non-Authorized Get Category API and copy the API call onto the clipboard
- Paste the copied code into your button click (you may initialize and alter the variables accordingly and ahead of time)
- Upload the plug-in and create a destination package (API Testing) where you can upload the .zip file to. Once you have installed your plug-in onto your Marketplace, click on the Upgrade button
- Click on the button and check the console log to see if the response matches the corresponding response on Postman
How to call the Admin Authorized Get All Users API
The second practice test API we will conduct will be the Admin Authorized API Get All Users.
- Go to the Headers tab in your Postman app
- Under the parameter called Authentication, you will see the Bearer (admin token) under the Value header. The majority of our APIs use the bearer token authentication method to authorize user API requests. Furthermore, some of our APIs maintain limited access based on the user’s role as an additional level of security. This admin token will be the authorization key that can be found on any webpage of your Marketplace
- Go over to >> and click on Application followed by Cookies
- Find the variable called webapitoken. Copy this variable and paste this token onto a variable in Postman called admintoken
- Click on Send
- Reverting back to the coding aspect, go back to Arcadier’s API page and copy and paste the request onto your clipboard and into your button click. You may alter the variables if necessary
- You have to access your admin token from your Marketplace but however in order to do this, you will need to find this function called GetCookie(). Store it into a variable called var token = getCookie()
- Upload the plug-in as per normal by compressing and zipping the files. Run a plug-in test to see if it will console log a response
Creating a new merchant user using two APIs that requires:
- A body of text parameter
- A URL parameter
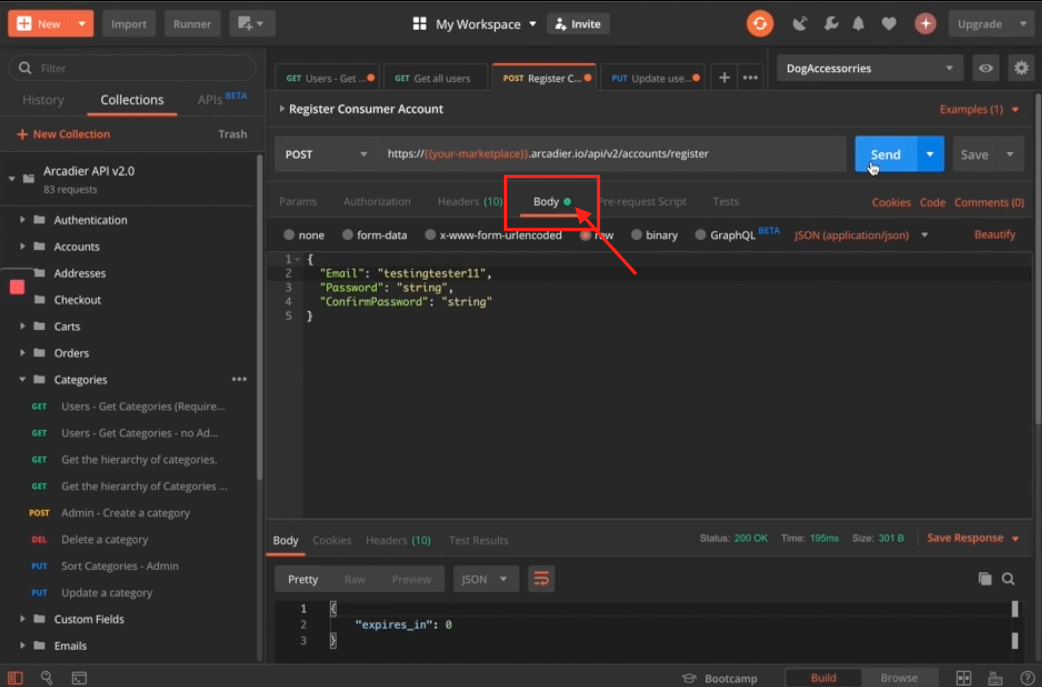
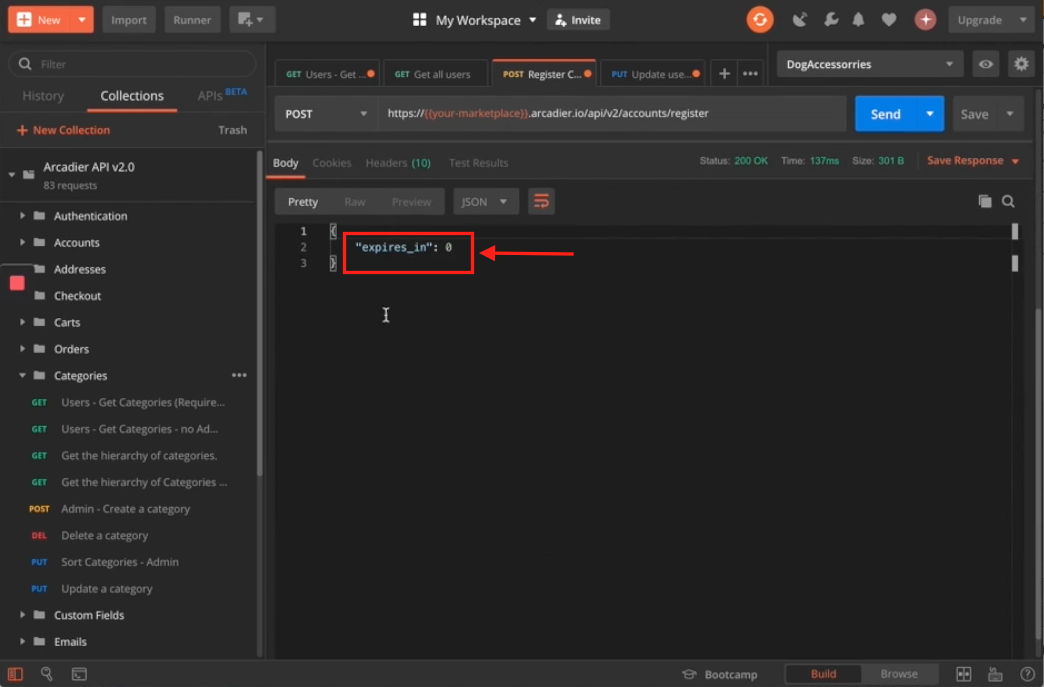
The first API to be called is for registering the consumer account. This particular API requires an authentication and a body of text. The body of text is in the form of a json body which will feed into the API’s parameter. This API also requires an admin token which you have already obtained. Type in the desired information you want and click on Send and a standard response will be given to you.


- In order to edit the User’s role in your marketplace, you will need to obtain the Specific User’s ID. Therefore, you will need to call the Get All Users API again and perform a search for the Specific User ID associated with your created user
- Once you have found your created user, copy the UserID and save it under a variable called userId
The second API to be called will be the Update User Role API.
- This particular API only requires the admin token (which you already have) for authentication
- An additional parameter is set in the URL of the API where you will need the UserID as well as the role you would like to update
- For this example, it will be the creation of a merchant. The end of the API call should have merchant. When you click on Send, the true response (“Result”: true) should have merchant as a parameter
This coding aspect is very similar to the previous API call examples. In order to add a json body to your API call, you will need to initialize a variable called “data” inside of Settings. One of the ways you can implement this is to create helper functions that you can implement this however you would like to. Upload the created plug-in onto your Developer’s Dashboard and run a plug-in test to see if it functions the way it is supposed to.
Important Note
Pressing the button function multiple times will result in error responses (Bad Request, Internal Server Error, etc) because Arcadier’s platform does not allow multiple user creations using the same username.
Results
This guide teaches and shows you how to access Arcadier’s APIs through Postman and javascript. For more information, visit Arcadier’s API page for more about specific APIs.
