
 API References
 API change log
Securing Information with PHP
This guide covers
- Introduction to PHP
- How to properly secure information with PHP
- How and when to incorporate PHP into your
By downloading this file, you agree that its use is subject to the applicable Terms of Service and You can only use and modify the content in these exercise files with the following agreements: That these files are for Your own personal use for education purposes and to practice the skills to develop on Arcadier. That by using or altering these samples codes, You understand that Arcadier is not responsible for any effects these codes may have on your application, software or environment, both positive or otherwise.
Guide Article
PHP stands for “PHP: Hypertext Preprocessor”. Some knowledge of HTML is ideal in order for you to better understand this language. PHP is dynamic and platform-independent. This guide will walk you through creating Custom Fields using PHP. This coding language is essential for this particular API call as it allows you to be able to protect sensitive information, specifically the Client’s ID and the Client’s secret, from being displayed to the normal User.
At the end of this guide, you will be able to Create Custom Fields using APIs and incorporate them for dynamic User storage.
Let’s begin:
There are various codes that this plug-in consists of. For this example, we will have three PHP files together with a single html and javascript file.
Important Note
The entire source code can be found above. The html and javascript file are just for front end and declaration purposes only. The true functionality of the plug-in comes from the three PHP files.
Like all other basic plug-ins:
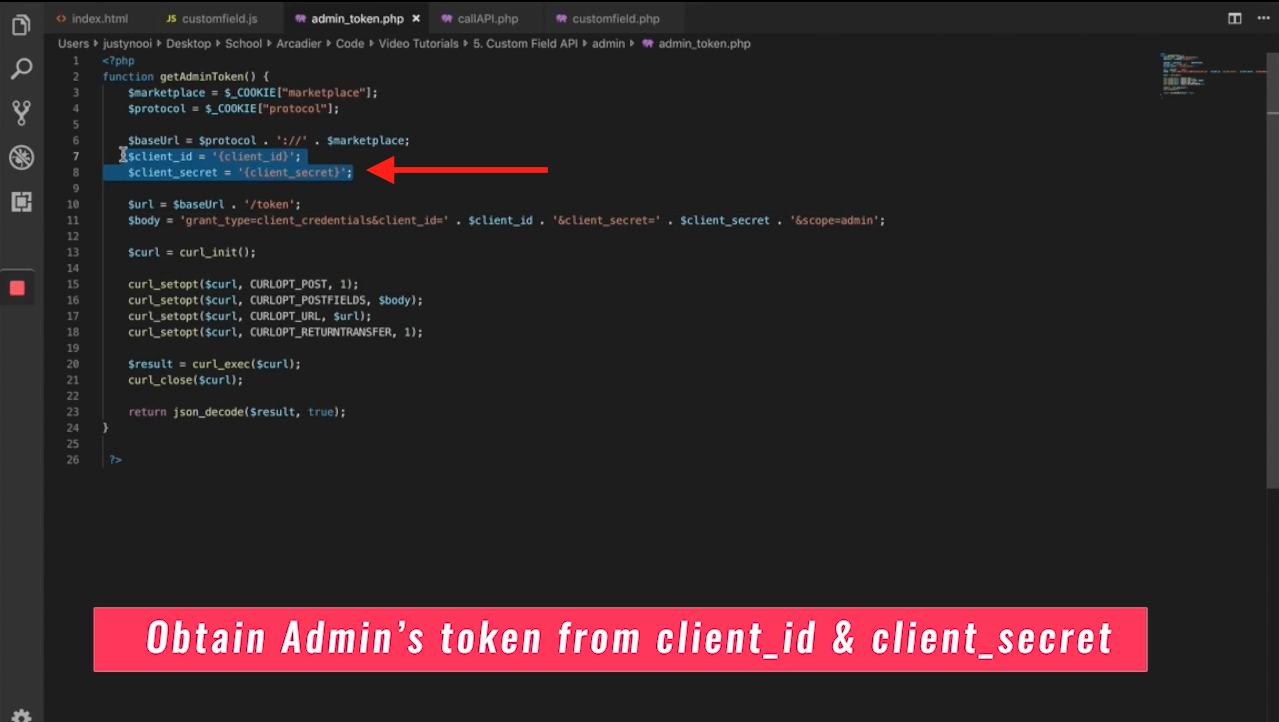
- The admin_token.php file is a standard file. It will allow you to obtain the Admin’s token from the Client’s ID and Client’s secret.
- These two variables are only accessible through the Admin’s portal and are not accessible by ordinary Users
- With the implementation of PHP, Users can access Admin-authorized APIs through the help of this file
There are other functions declared in the CallAPI.php file. The basic structure of calling an API is declared as the very first function. It also has supporting functions such as getting the Marketplace’s base URL, the packageID, and the Custom Field’s prefix.

- For the purpose of this guide and particular plug-in, we need to consider these two files as header files that will declare the functions to be called in the main Custom Field PHP file
- When you take a look at the Custom Field PHP file, you will see that many of the supporting functions are called and stored into various variables
To go through the main functionality of the API call and for the purpose of this guide example, we will:
- Declare Custom Fields on the Developer’s dashboard instead of using the Create Custom Field API. However, both functions are the same so you have the option to implement one or the other based on your intention with the plug-in
- Creating Custom Fields from the package itself allows for a single memory location only. However, attempting multiple calls to the same custom code will overwrite each other
- You will need to replace these lines with the actual Custom Field API to call the Create Custom Field API rather than retrieving the Custom Field code

- Upload and Enable the plug-in from your Developer’s dashboard. Go to the particular package that you want to upload the package in. Click on the Manage tab
- Click on “Add New” and create the Custom Fields there


The parameters on Arcadier’s Custom Fields APIs are exactly the same:
- Name parameter
- Field type parameter
- Reference table parameter
- Similar to the Marketplace, you will need to declare the two custom fields - TestValue and TestHashValue under the Implementations tab
Referring back to the code, these lines are essentially:
- Retrieving the custom field’s code
- Retrieving the input from the user
- Hashing it using SHA256 with salting
- Storing the code into the custom field
There are a few places in which you have to replace values according to your custom fields. In these two places, replace custom field 1 and 2 with your corresponding field names as well into your custom field javascript file.


- Now that you have already installed the plug-in with the correct variables, go over to the specific plug-in and input test values. Click on Save. The results will be displayed onto the page together with a success message. However, take note that if you keep the fields blank it will alert you to fill in the fields.
Going over to your Postman app, as the custom fields were created for the Marketplace you can double check to see if the variables are declared and stored properly under the Get Marketplace information API. Call this API and scroll down to the bottom of the page and you will see that the values are properly stored.

Important Note
Resending in data into your Custom Field will overwrite all of your previously declared data. In the Postman app, the old values will be erased and replaced with the new values.
Results
This concludes your understanding of the onsets of Custom Fields and why PHP is essential to the security of Arcadier’s APIs.
In the next guide, we will explain in greater detail about the entirety of Custom Fields. We will also explain how to implement, explore, and display them on any interface.